Tuesday, March 7, 2017

Flowers Are Mine

Sometimes I look around my desk and wonder why I don't just throw everything laying around in the wastebasket. Then I make a card with some of those things. That's why I cannot seem to throw away those extra flowers, leaves, die cuts, etc away. This is one of those cards. I needed a card for a special friend. Found the die cut in a small tray on the left side of my desk. The flowers were from the "flower drawer" and the leaves were from a small plastic box of "greenery". Often when I have a small scrap of card stock left, I will punch or die cut a flower or two. If it is green card stock, I will punch or die cut greenery until the scraps are so tiny that I can do nothing else with them. I have found that I like to have different shades of greenery on hand. When I am in the middle of making a card, I don't have to stop and cut the leaves.

I started out making this card with the idea that it would be a sympathy card. I had cut the large circle medallion months ago (from a Spellbinder's die). To keep the colors soft I used the same vanilla card stock that the circle was cut from. From the "flower drawer" I found the parts for the flowers which had been cut from SU island indigo card stock. Some parts had already been sponged with whisper white craft ink. The greenery was already cut. After laying everything out, I sponged a little island indigo ink onto the medallion so that it would show up better. I did not add a sentiment because I knew that I could use the card for many different occasions. 

I love flowers and I love putting them on my cards. I love springtime and I love seeing all the different flowers come to life after a winter of rest. 

"Take a good look at God's Wonders--
They'll take your breath away."
Psalm 66:5 (The Message)


Wednesday, March 1, 2017

Card in An Envelope

In just over a week, Grandpa and I are hoping to see our grandchildren who live in northern Kentucky, just south of Cincinnati, Ohio. I wanted to give each a card with a small cash gift inside. I decided that the ideal card would be one of the cards that is made inside an envelope. Mine turned out to be 5 1/2" x 5 1/2" square. I used double sided designer paper. The belly bands were made from a small strip cut from the leftover paper and turned to the opposite side. The challenge for me was how to decorate the inside of the cards and what accent piece to add to the belly band. I only got pictures of the insides of two cards. This was a fun project but I thought I was never going to get finished. My creativity was not working very fast.


Friday, February 24, 2017

More Flowers

I was asked about embossing and stenciling with Spellbinder dies a few weeks ago at one of my stamp classes. I made this card to show how you can emboss and sponge the paper before removing it from the die. I cut and then embossed each die cut. Before removing the white oval from the die, I sponged some SU Pool Party ink lightly around the edges. That is a very simple way of getting the look of another layer to your focal image. I didn't add a sentiment to the card. One can be added later or I might just use it the way it is. I don't think that every card must have a sentiment stamped on the front. Sometimes the beauty of the card can speak for itself.

I made the flowers using a flower die and punches. The leaves were stamped using a stamp from the SU  "Summer Silhouettes" set. I tried to add some accents to the centers using a marker.


Thursday, February 23, 2017

Flowers Are My Favorite

I love making dimensional flowers to go on my cards. I got some new paper last week and I had to try it on this card. You can see how the paper has a batik look. It makes beautiful flowers and it also made a beautiful background. For the flowers, I used a couple of different size punches, did a little shaping, added a little ink to the center and used prills in the centers. Prills can be purchased from USArt Quest in Chelsea, Michigan. You can also order on-line from their website -- USArt Quest. There are over 2 dozen different colors to chose from. After everything was assembled and the glue had dried, I added a few accents of stickles to the petals of the flowers for some sparkle.

For the leaves, I used the stamp set and coordinating framelits called "Botanical Blooms". The sentiment is from the Stampin' Up stamp set "Birthday Blooms".


Wednesday, February 22, 2017

February Love Notes

Valentines Day sort of came and then was gone. Don had a neurology appointment that morning in Ann Arbor. In the evening we had our Parkinson's Support Group meeting. There was not much time for us to celebrate the day. On the Sunday evening before, we hosted a Valentine Dinner party. We had fun sharing the evening with friends. I also made a couple of small valentine cards for Don and hid them in some unusual places. He enjoyed finding them.

For the first card I found the "I love you" paper in the scrap box. I had used it before for a Valentine card but I still thought it was a good choice for this card. Added a couple of die cuts and I was done. The card was very simple but it said just what I wanted it to say. For 55 years I have loved this man. In June I will have shared 50 years of my life with him as his wife.


The second card had more stamping on it but still very simple. I used stamps from four different stamp sets. Added some sponging to soften the white card stock. Used two layers of card stock for accent and this card was finished.


day after day  year after year
"You are my sunshine"


Friday, February 17, 2017

Beautiful Paper

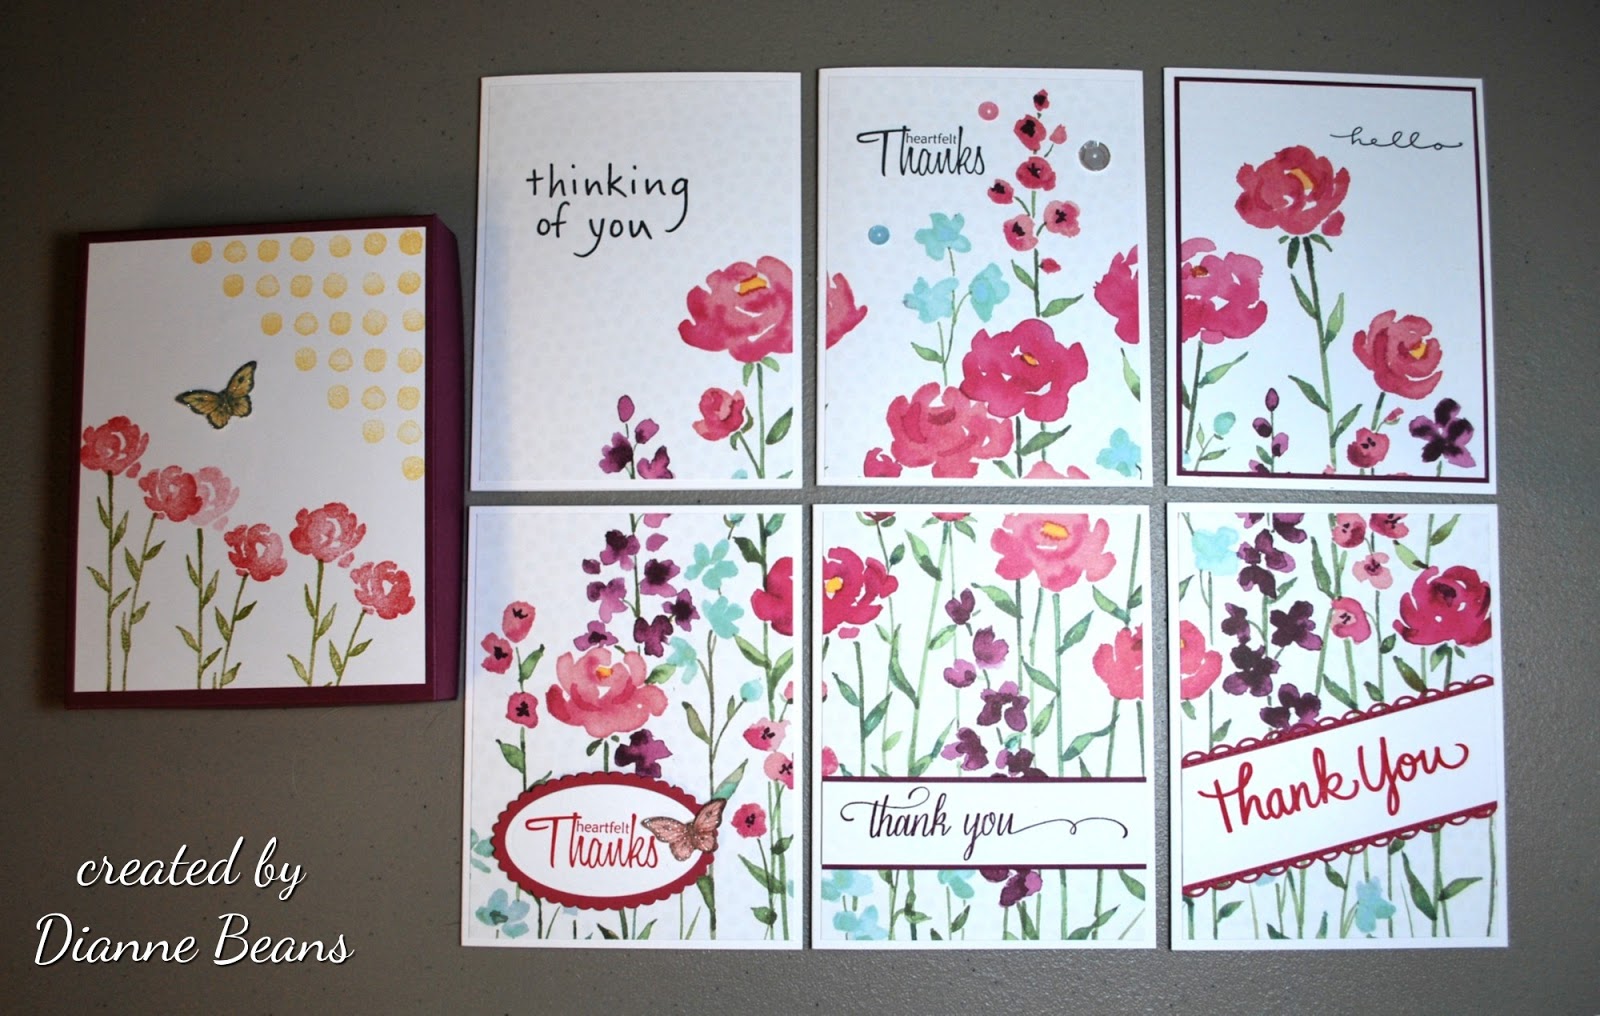
Just came across some pictures of a "thank you" card set I made about a year ago as a gift for a friend who was having surgery.I had this beautiful sheet of designer paper and I saw a card set made with the paper on Pinterest. It was the inspiration I needed to cut up that sheet of paper and make a set of six cards.


Thursday, February 9, 2017

He Is Risen

I spent the morning working on an Easter card for our stamp club's March meeting. I wanted a card that tells the true meaning of Easter. It is not about the Easter bunny, candy or eggs. It's about the fact that Jesus died, was buried and raised from the dead in order to provide my Salvation.


I began by cutting this Sweet 'n Sassy Stamps die out of black card stock. I have had the die for a couple of years and have never used it. It is time! To create the background, I began by sponging blue ink onto a piece of white card stock. Stamped the sun (from the SU stamp set "Kinda Eclectic") in SU Crushed Curry ink. Black card stock was used to create the mount. The sentiment was from a very old Cornish Heritage Farms set that I purchased before the company went out of business. I trimmed the focal piece, layered it with a piece of blue card stock and added it to a white card base. Simple. I wanted to add something else but stopped. Not sure what that something else should be.


He is not here; he has risen!
Remember how he told you,
while he was still with you ...
"The Son of Man must be delivered
into the hands of sinful men,
be curcified and on the third day
be raised again."
Luke 24:6-7 NIV

Saturday, February 4, 2017

Two Cards -- The Same But Different

This card is from yesterday's post where I had made a set of cards using a "one sheet wonder" sketch pattern. I needed a card for a friend who fell earlier this week and broke her foot. So-- I decided to make a card following the same design as the first card using the same paper and similar color palate.


This is the new card I made. I hope that you can see the similarities and the differences. By using the same paper and choosing different sides, you create two unique cards.This sentiment if from Our Daily Bread Designs Mini Tags 3 set.


Here is the two cards together. Makes me wonder how many different looks could be achieved with this sketch and these papers. Should I try?


Friday, February 3, 2017

Second Card Set

I enjoyed making the first set of cards using the One Sheet Wonder patterns so much that I decided to try another set with some beautiful paper I purchased at my local scrapbooking store, Altered Art Addicts in Spring Arbor, Michigan. The piece was by Graphic 45 called "Pretty Primrose" from the Secret Garden Collection. The minute I saw the paper, I knew that I had to have at least one sheet. I am beginning to think that I need to go back and purchase a few more. Here are the cards--

The Complete Set


For this card and the next one, I used SU Cajun Craze card stock for the base. I also used SU So Saffron in the layers. The sentiment is from a long time retired Stampin' Up set called "Lots of Thoughts". The flower came from the Stampin' Up set called "Fabulous Florets". It was stamped on white card stock using Memento Rhubarb Stalk ink. I used the Memento ink because I knew that I wanted to add some additional color and highlights using my copic markers. I think that this flower was meant to go with this paper.


For this second card I used the "Friend" stamp  from SU's set "Awesomely Artictic". Using my Misti, I stamped it in three colors -- So Saffron, Cajun Craze and Old Olive.


The last two card are made using SU's So Saffron card stock for the base. Most of the layers are SU Cajun Craze. The elements on the card above were added directly to the card base. The sentiment is from the SU's set "Whimsical Words".


Some time last year, I began to be aware of how many stamp sets I had that I had never used or used very little. I decided that it was time to slow down on the purchases and start using what I had. It has been fun to see how much I really love lots of the retired stamp sets. I guess that doesn't help the stamp companies but it has made me more aware of what I have and what works for me. That doesn't mean that I have not purchased anything new; it just means that the things I do purchase tend to be ones that I really, really like.

Have a great day stamping.


Wednesday, February 1, 2017

One Sheet Wonder Technique

I have looked at different pictures of cards that were made using only one sheet of designer paper. Some instructions call for a 12 x 12--inch sheet of paper. Some call for a 8 x 8--inch square of paper, some 8 1/2 x 11--inch piece. I chose to make four cards using a 6 x 6--inch piece of designer paper.

I chose to use a sheet from the Stampin' Up's "Love Blossoms" designer series paper stack. The card bases and mats were made using SU Early Espresso card stock. I also used a couple of small pieces of SU Crumb Cake card stock for a second layer on the first two cards.

From Pinterest, I found the cutting guide and sketches on the following blog -- Crafts By Happy Stamper. I also found the sketches on this address -- Poetic Artistry. I believe that this last one may be one of the original posts. The date was September 5, 2008.


Here is a picture of each card.


The sentiment for this card is from Our Daily Bread Designs. It is stamped in Memento's Rich Cocoa ink.


This sentiment is a stamp from Stampin' Up's set called "Awesomely Artistic". I used my Misti to get the words in perfect alignment. "Friend" is stamped in three colors--SU Blushing Bride, Rose Red and Memento Rich Cocoa.


This "Thinking of You" sentiment is from SU's Sassy Salutations" stamped with Rose Red ink.