Thank you for stopping by to visit my blog.
Monday, March 28, 2016
The Paper Players Sketch Challenge
Using this week's sketch challenge from The Paper Players blog, I made a "thank you" card. It took me most of the afternoon to decide what papers to use. I found these three Designer Series Papers in the box of scraps. They coordinated with SU's Rich Rassleberry card stock. I always love using this color. The flower was stamped using a flower from the SU "Mixed Bunch" set. The sentiment is from the Unity set called "Butterflies and Sunbeams".
Monday, March 21, 2016
A Flower For A Friend
Made this card this morning for a friend who has not been feeling well. It is a mixture of several new items and some older tools. The leaves are from a SU set that I just got -- "World of Dreams". I have wanted this set for a long time. The embossing folder is also new called Softly Falling Textured Embossing Folder. The sentiment is from a Unity set punched out with SU's word window and layered with the coordinating punch which has been retired. The flower was made using a punch, sponging the edges and running it through an embossing folder. Lastly, I added an organdy bow made with a fork.
Praying that your day will be beautiful.
Friday, March 18, 2016
Summer Flowers
I have continued to practice my watercoloring with markers. For this card I used a stamp from Heartfelt Creations. This is probably the very first stamp I ever purchased from them many years ago at the very first stamp show I went to. I love the image but have always felt threatened by the coloring that it needed. I stamped the image on watercolor paper and heat embossed it. I used Tombow and distress markers to do the coloring.
I made the card for our first sketch challenge at Altered Art Addicts. I love using a sketch for making a card. Here is the sketch--
The inside--
I made the card for our first sketch challenge at Altered Art Addicts. I love using a sketch for making a card. Here is the sketch--
Thursday, March 17, 2016
Pop Out Swing Card
I saw a really pretty card a few weeks ago that I fell in love with. I finally found instructions and set about to make the card. I was challenged and had fun learning how to put this card together. I found the instructions on the blog Creatin' with Kristeen. I did a close CASE of her card. I was having difficulty coming up with my own idea for this first card.
I used the Stampin' Up set called "Blessed Easter". I love these tulips; they are so easy to color. The card stock is Stampin' Up's Strawberry Slush. The image is stamped on Canson 140# watercolor paper with VersaFine Black Onyx ink and heat embossed with fine detail clear embossing powder.
For my second card I used Stampin' Up Pistachio Pudding card stock. I found the flowers and leaves in my stash of design elements. The finished size of the card is 5 1/4 x 5 1/4 so I had to make my own envelope. I used some scrapbook paper that I have had for a while. Using my envelope punch board, I cut my square at 8 1/2 x 8 1/2-inch and scored at 4/1/4-inch.
I used the Stampin' Up set called "Blessed Easter". I love these tulips; they are so easy to color. The card stock is Stampin' Up's Strawberry Slush. The image is stamped on Canson 140# watercolor paper with VersaFine Black Onyx ink and heat embossed with fine detail clear embossing powder.
For my second card I used Stampin' Up Pistachio Pudding card stock. I found the flowers and leaves in my stash of design elements. The finished size of the card is 5 1/4 x 5 1/4 so I had to make my own envelope. I used some scrapbook paper that I have had for a while. Using my envelope punch board, I cut my square at 8 1/2 x 8 1/2-inch and scored at 4/1/4-inch.
Wednesday, March 16, 2016
Let Us Use Markers
I have been asked what is the difference between different brands of markers. I am not sure that I know how to answer that question. There are Stampin Up markers, Tombow markers, distress markers, Marvy markers and Memento markers -- just to name a few brands. All of these are water based markers.
I love coloring directly on my stamps with the Stampin' Up markers. I love the watercolor look I can get with my Tombow and Distress markers by Tim Holtz. The ink can be reactived by water when coloring directly to the watercolor paper. I love the way that these markers can be blended.
For the images below, I stamped each one with VersaFine Black Onyx ink and then heat embossed each with fine detail clear embossing powder on Canson 140# watercolor paper. Below each picture you will see a list of the colors that I used.
Stampin' Up "Blessed Easter" Stamp
Flowers (Left)--Festive Berries Distress Marker
Leaves--Mowed Lawn and Forest Moss Distress Markers
Background--Tombow #491 Glacier Blue
Flowers (Right)--Squeezed Lemonade and Ripe Persimmon Distress Markers
Leaves--Mowed Lawn and Pine Needles Distress Markers
Outline--Tumbled Glass Distress Marker
Rose stamp from Inkadinkado
Distress Markers used: Flowers--Squeezed Lemonade and Ripe Persimmon
Leaves--Shabby Shutters and Mowed Lawn
Background--Tumbled Glass
Stamp from Northwoods Rubber Stamp Co.
Bird--Broken China and Ripe Persimmon Distress Markers
Leaves--Mowed Lawn Distress Marker
Branches--Distress Markers
Outline--Black Soot Distress Marker
Background--Tombow # 491 Glacier Blue
I love coloring directly on my stamps with the Stampin' Up markers. I love the watercolor look I can get with my Tombow and Distress markers by Tim Holtz. The ink can be reactived by water when coloring directly to the watercolor paper. I love the way that these markers can be blended.
For the images below, I stamped each one with VersaFine Black Onyx ink and then heat embossed each with fine detail clear embossing powder on Canson 140# watercolor paper. Below each picture you will see a list of the colors that I used.
Stampin' Up "Blessed Easter" Stamp
Flowers (Left)--Festive Berries Distress Marker
Leaves--Mowed Lawn and Forest Moss Distress Markers
Background--Tombow #491 Glacier Blue
Flowers (Right)--Squeezed Lemonade and Ripe Persimmon Distress Markers
Leaves--Mowed Lawn and Pine Needles Distress Markers
Outline--Tumbled Glass Distress Marker
Rose stamp from Inkadinkado
Distress Markers used: Flowers--Squeezed Lemonade and Ripe Persimmon
Leaves--Shabby Shutters and Mowed Lawn
Background--Tumbled Glass
Stamp from Northwoods Rubber Stamp Co.
Bird--Broken China and Ripe Persimmon Distress Markers
Leaves--Mowed Lawn Distress Marker
Branches--Distress Markers
Outline--Black Soot Distress Marker
Background--Tombow # 491 Glacier Blue
Stamp from Heartfelt Creations
Candle--Tombow #491 Glacier Blue
Flame--Tombow #905 Red and #985 Chrome Yellow
Flowers--Festive Berries Distress Marker
Leaves--Mowed Lawn Distree Marker
Outline--Tombow Cool Gray #N95
Candle--Tombow #491 Glacier Blue
Flame--Tombow #905 Red and #985 Chrome Yellow
Flowers--Festive Berries Distress Marker
Leaves--Mowed Lawn Distree Marker
Outline--Tombow Cool Gray #N95
Thursday, March 10, 2016
Birthday Bouquet
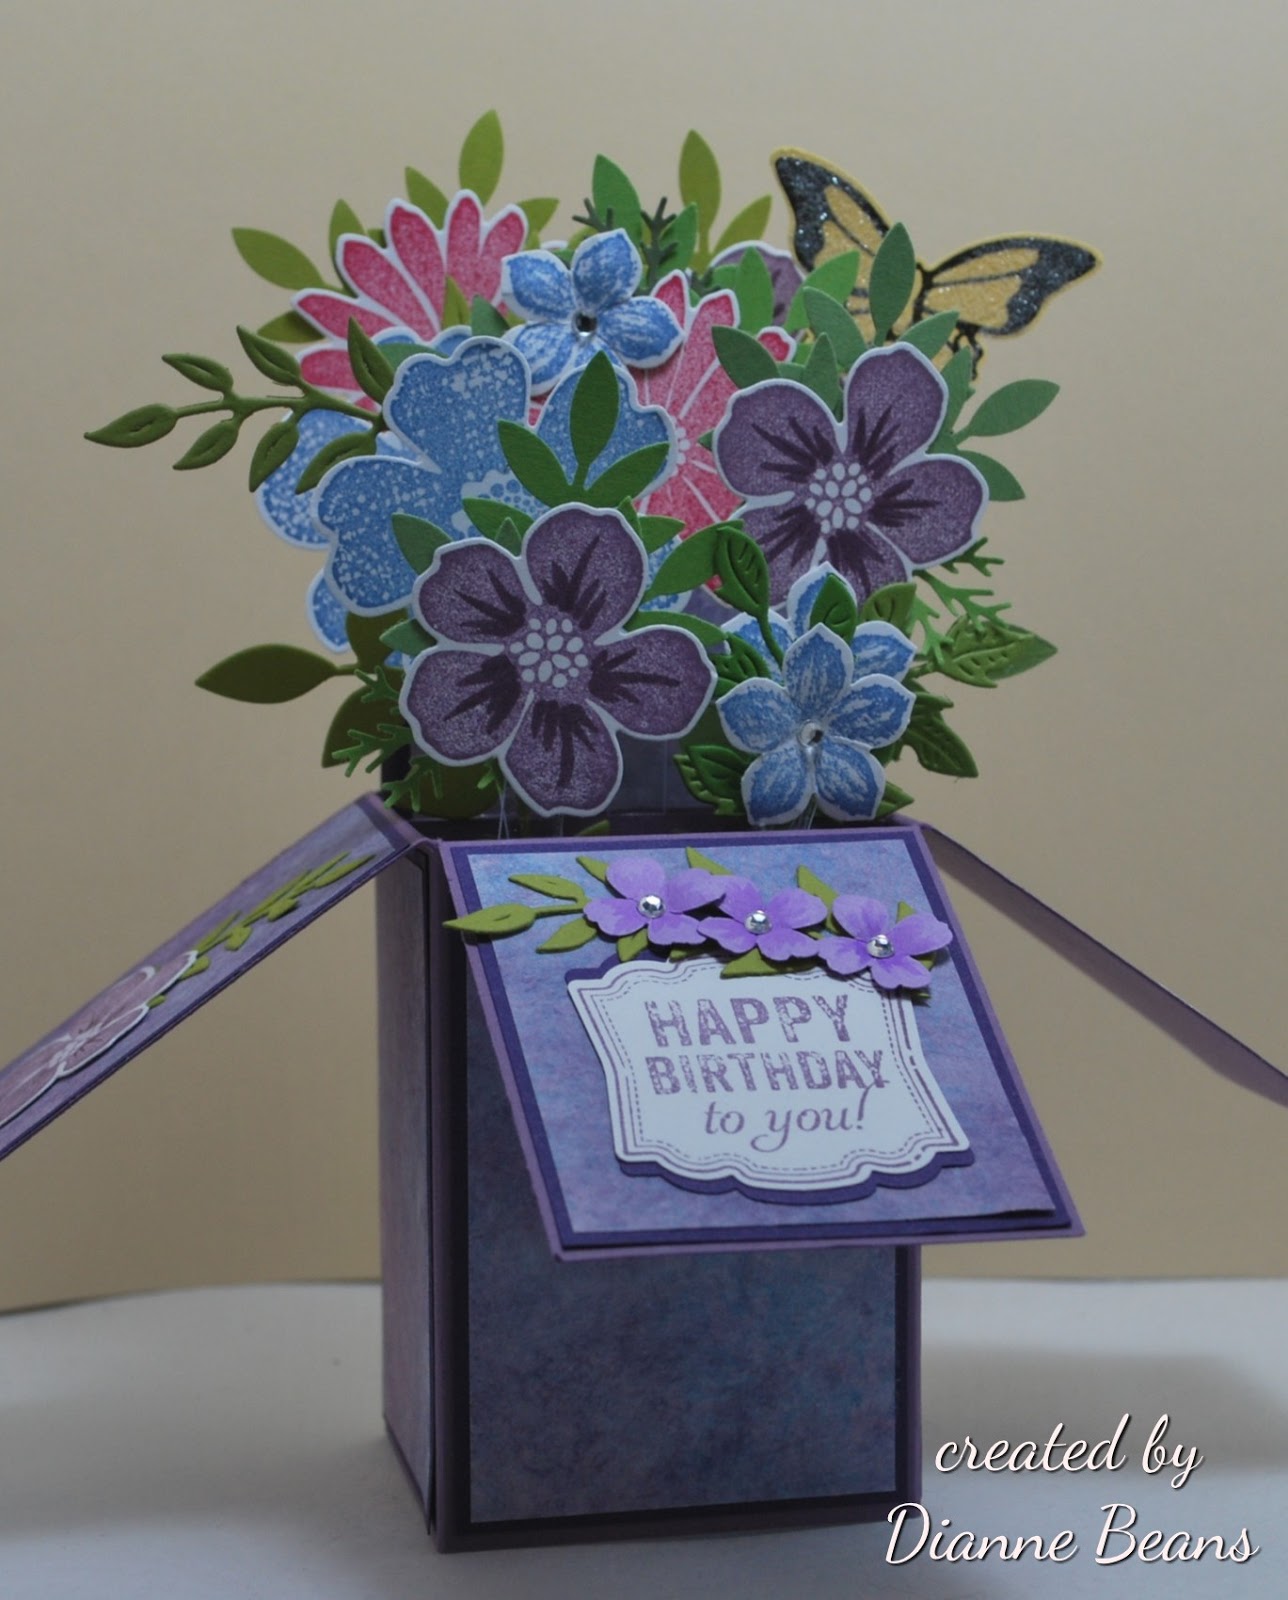
Sunday is our daughter's birthday. She is such a beautiful daughter, wife and mother. Angela, we love you!
I wanted to do a special card for her. I thought of the "card-in-a-box". If I made that card, I could send her a "bouquet of flowers". So that is what I did. If you are not familiar with this type of card, the three flaps fold up and the card goes flat for easy mailing.
I used flowers from the Stampin' Up sets Flower Shop, Petite Petals and Secret Garden. The butterfly was from the set called Nature's Garden. Stamps from a new set called Birthday Blossoms were used on the back of the box. The greenery was punched or die cut. Often, when I have a small piece of green card stock left over, I will cut or punch out as many different pieces of greenery as possible and put them in a little box. When I need some greenery, I can usually find it in that box.
I wanted to do a special card for her. I thought of the "card-in-a-box". If I made that card, I could send her a "bouquet of flowers". So that is what I did. If you are not familiar with this type of card, the three flaps fold up and the card goes flat for easy mailing.
I used flowers from the Stampin' Up sets Flower Shop, Petite Petals and Secret Garden. The butterfly was from the set called Nature's Garden. Stamps from a new set called Birthday Blossoms were used on the back of the box. The greenery was punched or die cut. Often, when I have a small piece of green card stock left over, I will cut or punch out as many different pieces of greenery as possible and put them in a little box. When I need some greenery, I can usually find it in that box.
Wednesday, March 9, 2016
Bouquet of Tulips
I needed a thank you card last weekend. My husband and I had been invited to a "German dinner" at our friends home on Thursday evening. It was delicious. I had been working on examples for a class about watercoloring with markers. I chose one of the images to go on my card. Below the card is a list of what I used to color this image. Thank you for stopping by.
I am working on a post showing some of the images I have made, but that's for another day.
Stamps--Stampin' Up "Blessed Easter" and "Peaceful Petals"
Stamped on Canson 140# Watercolor paper with VersaFine Black Onyx ink and heat embossed with clear fine detailed powder
Flowers--Tombow #062 Pale Yellow and Ripe Persimmon Distress Marker
Leaves--Mowed Lawn Distress Marker
Background--Tombow # 491 Glacier Blue
Sentiment colored with Squeezed Lemonade and Ripe Persimmon Distress Markers
Saturday, March 5, 2016
Masking
Masking is such a neat way to add depth to your card without adding a lot of layers. Last week I did a class at our local scrapbook store and had a lot of fun preparing for the class. We did three cards. The first two were with the SU set called "Flower Shop".
The first card was very simple -- The first step is to stamp your flower. Make a mask by stamping the image on a post-it note and cutting it out. Place the mask over the flower on your card. Stamp the greenery. Leaving your mask in place, spritz over the stamped area using a marker and the Tim Holtz air brush. Add your sentiment, mount the image on your card and you are all done.
The second card is done using the same principles just with more detail. The center flower is stamped and covered with a mask. The flowers on each side are then stamped. The mask is moved around so that the leaves and twigs can be stamped around each flower. To complete the image, I colored around all the flowers using a lite gray Tombow marker (N95). This step really makes the flowers stand out. The last steps were to stamp the sentiment and soften the white card stock by using a stencil and some sponging. I love the dimensional effect that is achieved this way.
The first card was very simple -- The first step is to stamp your flower. Make a mask by stamping the image on a post-it note and cutting it out. Place the mask over the flower on your card. Stamp the greenery. Leaving your mask in place, spritz over the stamped area using a marker and the Tim Holtz air brush. Add your sentiment, mount the image on your card and you are all done.
The second card is done using the same principles just with more detail. The center flower is stamped and covered with a mask. The flowers on each side are then stamped. The mask is moved around so that the leaves and twigs can be stamped around each flower. To complete the image, I colored around all the flowers using a lite gray Tombow marker (N95). This step really makes the flowers stand out. The last steps were to stamp the sentiment and soften the white card stock by using a stencil and some sponging. I love the dimensional effect that is achieved this way.
Thursday, January 28, 2016
Birthday Combos
Today I needed two birthday cards. After getting started, I decided that I would make matching calendars. I am going to just let the cards speak for themselves. I let the pretty papers be the focal points on the cards and calendars. Most pieces were from the scrap box -- there are so many treasures hiding in that box. I have also been trying to decorate the inside of my cards as well. It takes a little extra time, but it is so worth it.
Wednesday, January 27, 2016
No Frills--Just CAS
Today I am posting some simple cards that were made for a class on the CAS style. I love the simplicity of each one.
These last two cards are made using designer paper. I wanted the paper to be the focal image of the first card so I tried to keep it very simple.
I also used some paper from my collection and several scrap pieces that I found that worked perfectly for this next card. A punch was used to create the scalloped border. Another punch was used to make the hearts.
Subscribe to:
Posts (Atom)