Thursday, August 31, 2017

SC660

My daughter was here for a few days this week. She took her dad to Rock Steady (his exercise class) two afternoons and to his doctor's appointment in Ann Arbor. I got to have some time to myself and have lunch with a friend. I finally got my card made this evening for this week's sketch challenge at Splitcoast Stampers.

The Sketch


For my card I used a Stampin' Up retired set called "Wildflower Meadow" along with the "Touch of Texture" set. Perfect Plum ink and designer series paper was the color of choice. It was a fun sketch to work with once I got started.


Sunday, August 27, 2017

Inspiration In The Most Unusual Places

Last Thursday (August 24) after having breakfast with friends at Cracker Barrel, I was looking at things that were in their store. I saw a small picture. It was about six inches square with a white frame, a navy blue background and one single white heart shaped doily right in the center. I immediately thought of some of the heart shaped dies that I have. Later that day I tried turning that inspiration into a card. This is the result--


The cards are 4 1/4"square. The heart die is from Elizabeth Craft Designs. I love the delicate lacy design.

Then it was on to the next card. This one was used in my Saturday stamping class. The card base is Midnight Muse. I used a large scalloped edge die to cut the white layer and then three dies from the Eastern Medallions Thinlets set by Stampin' Up. The corners looked really bare so I added some stamping in each of the four corners. Everyone loved the card. I also cut a scalloped square for the inside of the card. Lots of fun.


The inside


Friday, August 25, 2017

The Same Yet Totally Different

A couple of days ago, I came across a card on Pinterest that really caught my attention. I especially liked the way the scoring lines were used to decorate the front of the card. So yesterday I had to try CASEing the card I saw. Here is the LINK to that card.

It is a relative simple card. I really liked the way the score lines were used to decorate the front. Of course I had to try using the Daisy Delight flower with the coordinating punch.


I was thinking to use this card for my stamp club meeting tomorrow morning, but then I came up with another idea. I had recently received the Eastern Beauty Bundle and I had been seeing this sunflower made with the thinlets. I love the way the flower turned out so this is one of the cards we will be making. The weather has really been cool here in Michigan the last few days so it is making me think of "fall". As we drive around we see many sunflowers in full bloom. Love them.


Wednesday, August 23, 2017

SC659 -- A Lilac Birthday Card

Today's sketch was very interesting. Lots of elements arranged in a very unique way. I would love to know what you see in the sketch.

 
Putting together this number of elements can be a challenge for me. I first started thinking about what paper I would use. I had purchased this pad of paper not long ago called "Lilac Love". It contains 36 sheets of double-sided designer paper. 3 sheets of 12 different designs. As I played around with the paper, I found the elements starting to come together.


And -- this is my card. The base is Pale Plum. All the other layers are from the Lilac Love collection, except for the white piece. The sentiment is from the Stampin' Up set called "Simply Sketched" and the flower is from the new set "Daisy Delight". I stamped the flower twice onto one of the lighter colored sheets with Memento Sweet Plum ink, used the daisy punch and created the center using VeraMark ink and gold embossing powder. I want to try  making another card using this same sketch. I love the design -- so unique.


Tuesday, August 22, 2017

Christmas Card Using SC657

I saw a video on how to glue vellum onto your project. I wanted to give it a try. I was also experimenting with embossing vellum using an embossing folder. This card let me do both.

To emboss the vellum, I first placed my card stock in the folder. I then laid my piece of vellum on top, closed the folder and ran it through my machine. The cracking of the vellum was kept to a minimum.

I then decided to use the layout from a sketch I had done just days before. I chose to use Stampin' Up's Cherry Cobbler card stock as my accent. Such a beautiful color. I trimmed the embossed vellum to the size I wanted, cut the Cherry Cobbler layer to the correct size, added glue to the vellum and laid it onto the card stock. Glue, tape or any kind of adhesive has a tendency to show when used on vellum. I followed the technique I saw on Connie Stewart's blog called "Simply Simple Stamping". Here is the link to her video -- Adhering Vellum Perfectly. It worked "perfectly". Finished up the other layers, assembled all and my card was finished.


Monday, August 21, 2017

CAS443 -- Sweet Birthday Wishes

Love the CAS challenge today at Splitcoast Stampers. "Sweet Birthday Wishes" I immediately thought of this stamp by Penny Black called "Sweet thing". It took me a while to find it. Then it was ready, set, go. I stamped the image with Memento Tuxedo Black ink and used my Prisma Colored Pencils (with Gamsol) to do the coloring. I cut the image out with Spellbinder dies, found some coordinating card stock, a piece of Designer Series Paper and the perfect birthday stamp. Finished. A very simple card. Just took a little bit of time to do the coloring.


Wednesday, August 16, 2017

Pale Plum Sketch Challenge

Today was another day that I had a chance to do a card for the Splitcoast Stampers sketch challenge. I am always anxious to see the sketch even when I don't have a chance to make a card.

Today's challenge --


I was not sure where I was going when I started out. Layer # 3 was tall and narrow. I thought that it needed a large, tall image. I found this one in the set called "Insightful Meadows" by Unity Stamp Company. I also wanted to do something using the emboss resist technique. I stamped the image with VersaMark ink and used a fine detail clear embossing powder to do a heat emboss. I also used a large background stamp to add some interest to the background. For adding the background I used Memento Gray Flannel ink. I then sponged very lightly over the embossed image using Perfect Plum ink. Then I discovered that the retired card stock color "Pale Plum" was a perfect match. To add some depth to the color I used a paint chip that I had picked up the other night while out shopping at Lowe's. It was just what I needed. The sentiment on the vellum was from a 2004 Stampin' Up retired set called "Sweet of You".

I hope that you have some time to be creative today.


August 20, 2017
My card was mentioned in Favorites for the week ending August 19, 2017 at Splitcoast Stampers.

Tuesday, August 15, 2017

A Color Challenge


I was working on a card yesterday for a color challenge that my stamp class is doing on August 26. The colors are Marina Mist, Crushed Curry and Wild Wasabi. I can't wait to see what every one comes up with.


 I wasn't sure how this was all going to turn out but I do love these colors together. The die I used was from Gina Marie Designs. I cut the die three times--one in Marina Mist, one in Crushed Curry and finally one in white. All the die cuts were taken apart and then one was re assembled. I love the patchwork look. The leaves were cut from Wild Wasabi card stock. The flowers were stamped and die cut. I really do love these colors together.


The Crushed Curry frame was used in yesterday's card.


Monday, August 14, 2017

A Clean and Simple Challenge

CAS442

I read the CAS challenge at Splitcoast Stampers this morning -- "Create a monochromatic colored card with a twist". The explanation for the twist read, "The twist is you can color one portion of your image, that is, if you use flowers, one flower only, not the leaves or other flowers." For this challenge white, black, grey and kraft are considered neutrals.

I was working on another card late morning when I got an idea. I was using a new die cut for my card. In the process, I had cut three images of the same die and I had all these extra pieces. I began playing around and this is the card that I came up with.


The die is from "Gina Marie Designs". I came across her dies at the Mega Meet that takes place in Novi, Michigan usually the second week end in May. She has some really cool dies. This one I purchased in May and had not used it. I had cut it three times: once in Marina Mist, Crushed Curry and white. I had already used the one in Marina Mist. This one in Crushed Curry was there waiting to be used. The little panda bear stamp is from the Unity Stamp Co. I stamped it onto the white circles using Crushed Curry ink. For the twist, I stamped a complete image using VeraFine Black Onyx ink and cut him out. I think this little panda is the cutest. I hope that the card will bring a smile to someone special.


August 20, 2017
This card was mentioned in the Favorites of the week ending August 19, 2017 at Splitcoast Stampers.


Saturday, August 12, 2017

My Latest Quilting Project

I have used this punch very little. I decided it was time to give it a try. I had seen a card similar to this. I had all these paper scraps together for another project. "Why would they not work for a card?"

As you can see, I tried it and they worked. I love the poka dots. I love the soft pastel colors. I love using something from my collection that has not been used very much. I love many of the retired stamp sets. This sentiment was from one of the first stamp sets I purchased "Always In My Thoughts" (2008). It was a perfect fit. I stamped it and punched it out.


Then I needed something for the inside of the card. I could have left it plain, but that didn't appeal to me. As I was looking through my stencils I found one that had little hexagons on it. Perfect!  I added a little bit of color using the stencil and some ink. Now, for me, it was complete.


Friday, August 11, 2017

A Sketch Challenge

I think that this is the first time I have done the sketch challenge at Splitcoast Stampers in over a year. I printed off a copy of the challenge on Wednesday, SC657, and found that I already had several things that worked perfectly with this challenge.

Here is my card


The little floral piece was an extra one I had done several weeks ago when I was working on another card. The flower was also on my desk; I had made it for a class that I had earlier in the week. All the other elements came together quickly.

The details--
I used SU Blushing Bride card stock for my base and topped it with a piece of designer series paper. The floral strip was a little piece of scrap designer series paper that I layered with Island Indigo card stock, cut a piece of Baja Breeze card stock with a scalloped edged die and added it to the back. The flower is from a retired Stampin' Up set called Stippled Blossoms. The leaves were punched from a piece of Certainly Celery (retired) card stock. They were really plain so I added some veins with a stamp and sponged the edges with Old Olive ink. The verse is from a Sweet 'n Sassy Stamps set called "New Creature". When I finally got it all together, I was pleased with what I had done. I would never have come up with this layout by myself.

Wednesday, August 9, 2017

A Special Thank You

I wanted to say thank you for the Stampin' Up orders I received last month. This is the note card I made and put in with their orders. I love the stamp set "Best Birds" and the coordinating dies. I also really like the retired In Color Crisp Cantaloupe with black. I guess I like most any color with black.
The words are from Spellbinders. I stamped the little flowers and used the matching die to cut them out. I should also mention that the size of the card is 4 1/4" x 4 1/4". To make the envelope, I use 24# copy paper, cut a square at 7" x 7" and score at 3 1/2" using my envelope punch board. That gives me the perfect size envelope for this size card.


I used stamps from the set "Colorful Seasons" to decorate the inside.


My prayer is that you will have a beautiful day!

Monday, August 7, 2017

Did You See?

Did you happen to see the video that Jennifer McGuire produced about adding scoring details to create unique backgrounds? I did and I had to try it! Here is a link to her video.

My cards are really a combination of several techniques that I have seen in the past. I have seen a couple of  names for this technique. I saw it called "grid technique" and "faux tiles". I started by scoring lines every 1/2 inch on the diagonal both directions. I then stamped on the side where the score lines create "valleys". The ink skips over the score lines creating the look of tiles. Then I sponged over the entire panel very lightly to take away the stark white of the card stock.

For this card, I used stamps from the Stampin' Up sets called "Touch of Texture", "Butterfly Basics" and "Petite Pairs".


The inside of my card

For my second card, I started by adding the score lines to my piece of card stock. Then using one of the stamps from the SU retired set "Stippled Blossoms", I began stamping all over the card stock creating a unique background. I had seen this on a card on Pinterest using a stamp set from Altenew.  I tried to stamp each image close to the previous image but not on top of it. I really love the result. Then on another piece of card stock I stamped the complete flower (using SU Soft Sky for the solid image and SU Pool Party for the second image), cut it out and sponged the edges. Love, love, love the result. The ink, layering card stock and ribbon were all Stampin' Up's "Pool Party" color


A close-up of the flower and background


Sunday, August 6, 2017

Inspiration Comes From --------

I find that inspiration can come in many different forms. Sometimes it comes from something  I see when I am out doing ________. Sometimes it comes from a picture I see hanging on a wall. Maybe it comes from pieces of clothing -- the fabric that a pretty dress is made of, a pretty blouse my best friend is wearing, a piece of quilting fabric that I have fallen in love with. Maybe it is a picture of a card that I have seen on Pinterest.

One day while looking at pictures of beautiful cards posted on Pinterest, I came across this lovely card. A real "clean and simple" beauty. I knew that it was one that I was going to have to CASE. First let me share the link to the "beautiful card" that I saw.

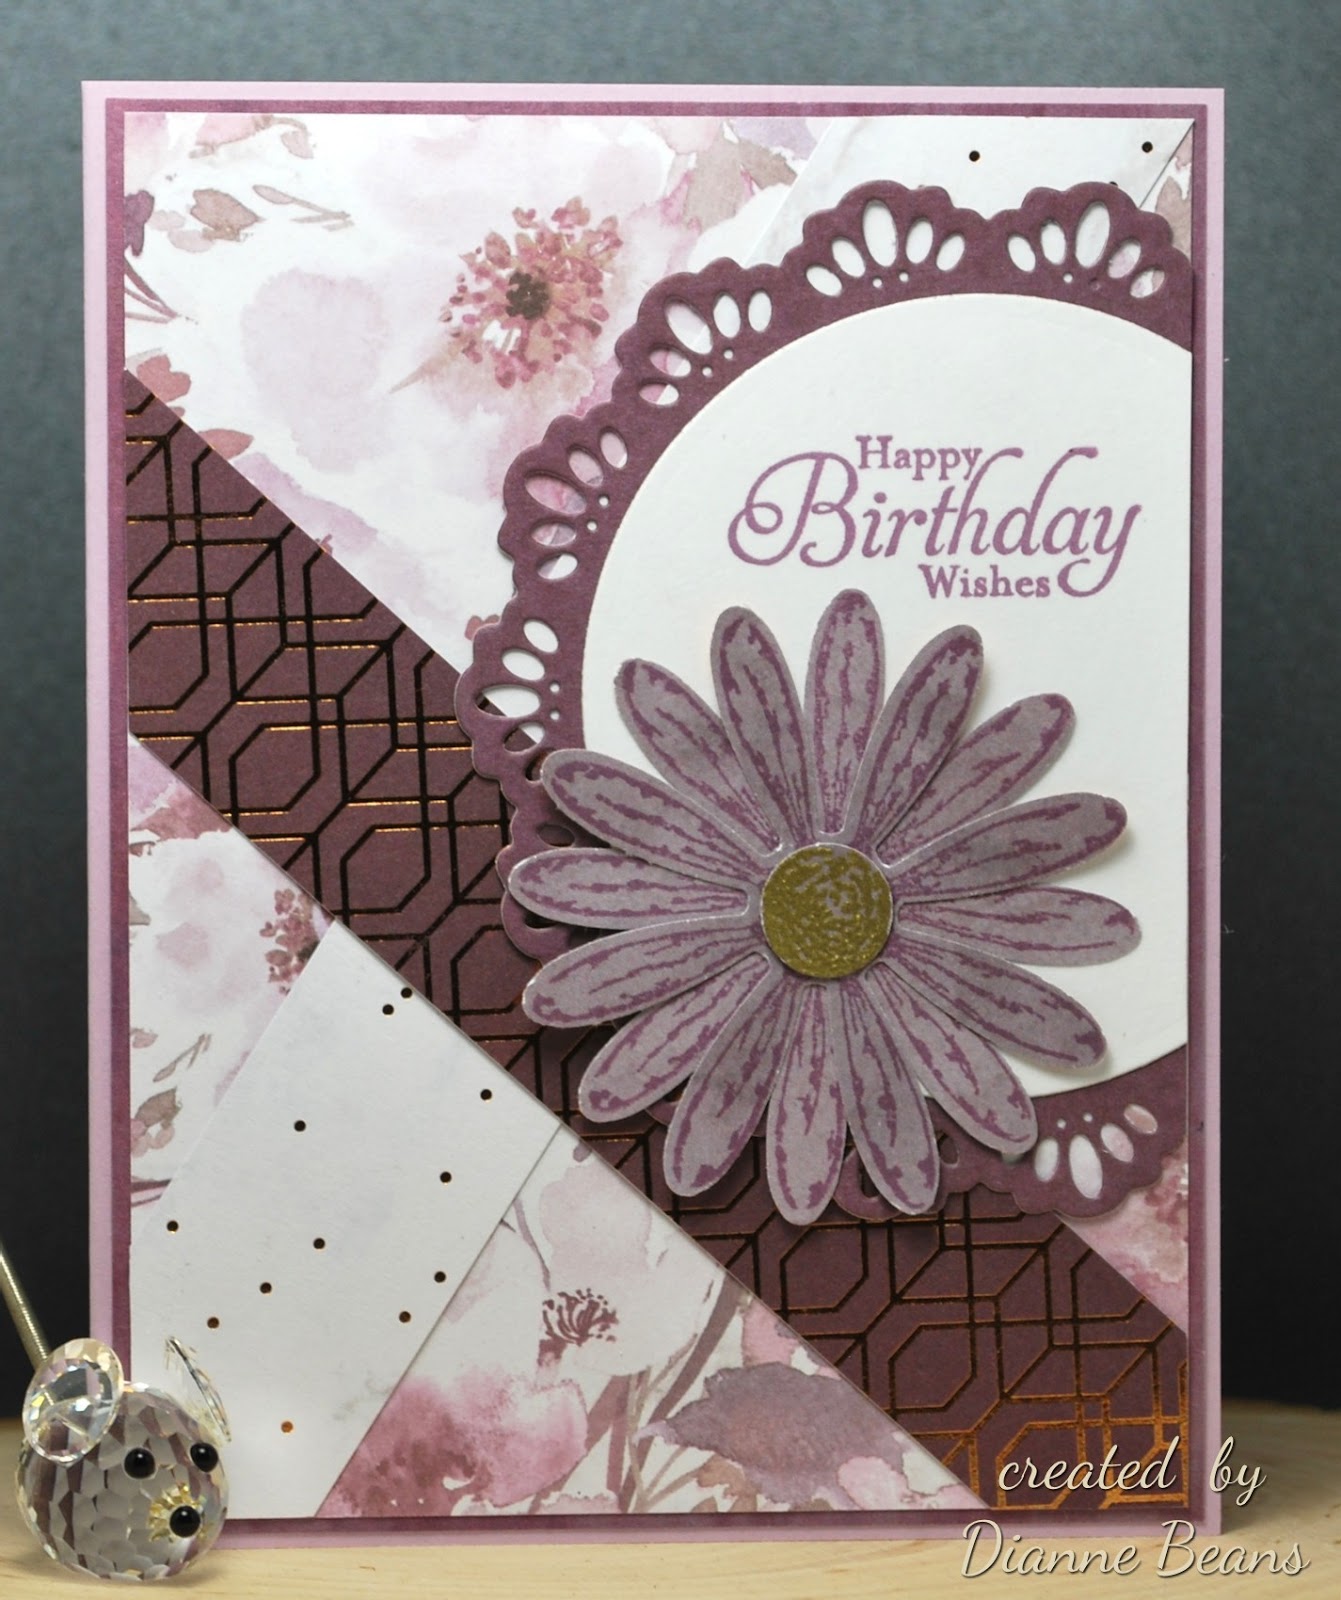
Now for a picture of the card that I made. I did use a different color and I haven't added a sentiment yet. So simple, so pretty. I hope that the person who will eventually receive this card will feel the same way. I happened to have the same punch used in the original card, but any pretty flower punch or die would work.


"Consider how the wild flowers grow.
They do not labor or spin.
Yet I tell you, not even Solomon in all his splendor
was dressed like one of these."
Luke 12:27

Thursday, August 3, 2017

For My Brother

My brother's birthday is in just a few days. I think that this is the first birthday card that I have gotten mailed on time. It turned out to be a simple card but one that I was pleased to mail.


Card base -- Pool Party card stock
Stamps -- Main Image "Moon Lake"
                 Happy Birthday from "Happiest Birthday Wishes"
                 Stars from "Big On Birthdays"
                 Inside greeting from "Botanicals For You"
Ink -- VersaFine Black Onyx embossed with clear embossing powder on watercolor paper and colored using distress markers and my aqua brush

Thank you for stopping by.


***This card was in the favorites for the week ending August 6, 2017 at Splitcoast Stampers